Vape Ignition Installation and Troubleshooting
Click here to download the installation instruction PDF
Table of Contents
Vape Electronic Ignition For British Motorcycles
12 VOLT IGNITION – TWIN CYLINDER MODELS
POSITIVE OR NEGATIVE GROUND WITH POINTS IN THE SIDE CASING
GENERAL DATA
This unit can work with positive or negative earth as long as the coils are fed from a positive
supply. The working voltage is 10-16 volts. The maximum current through the unit must not
exceed 5 amps. For road applications two 12 volt coils in series are satisfactory and for race
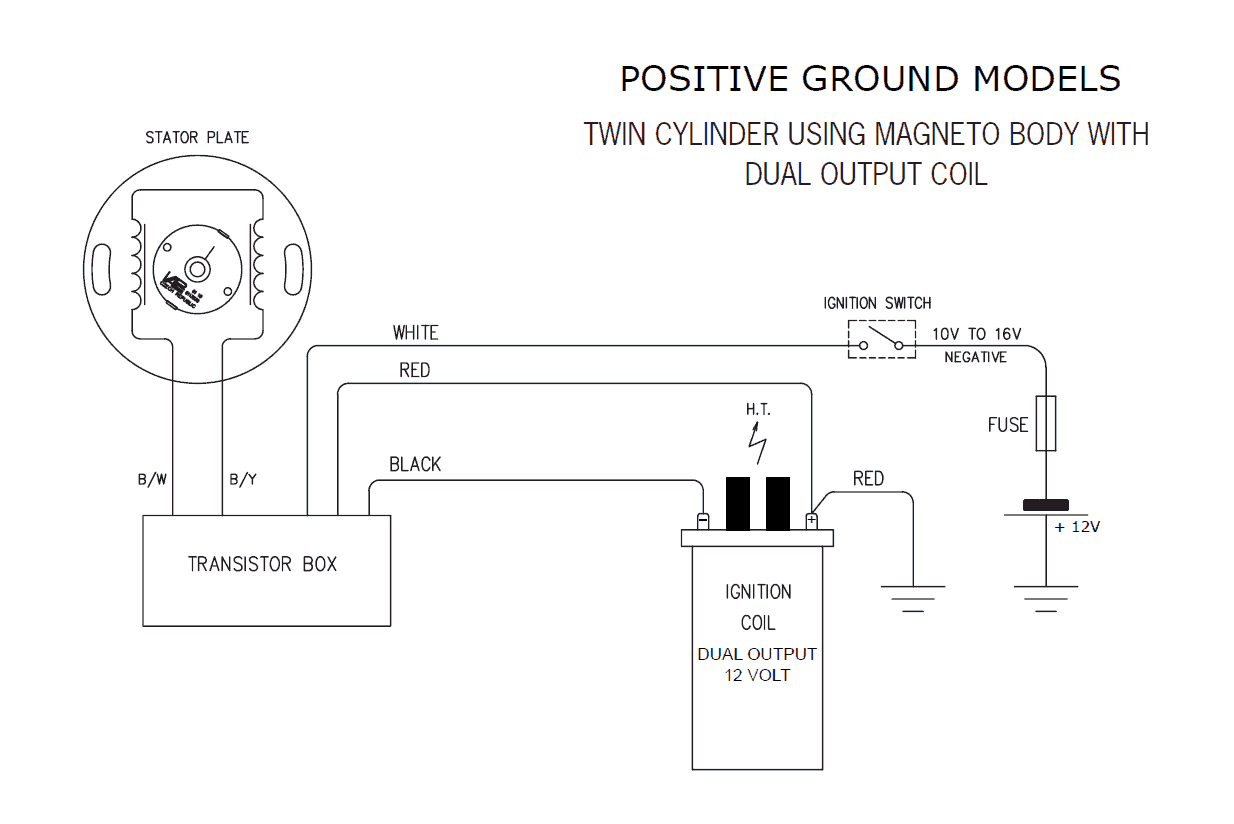
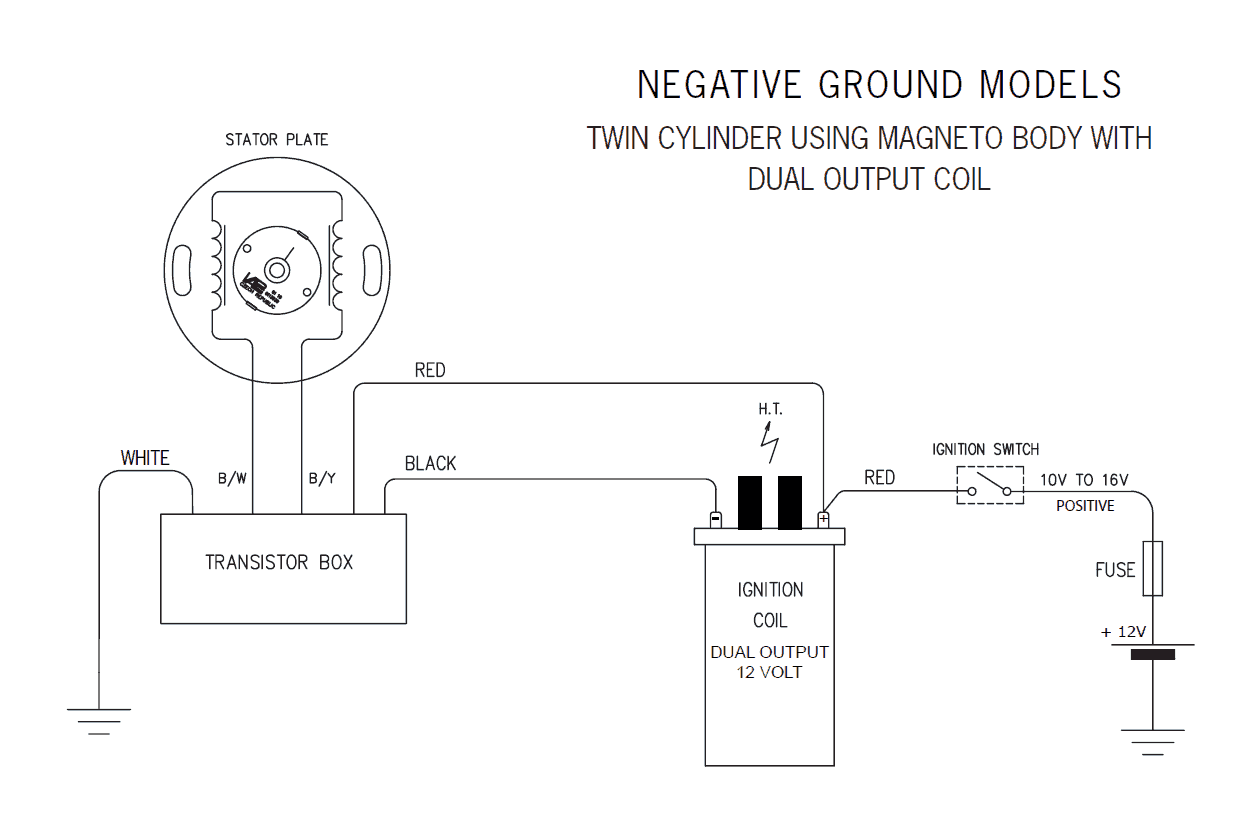
applications a double ended coil with primary resistance of 3-4.5 ohms will give best results. Any
short circuit on the ignition coils will damage the unit. The coil current should drop to zero after
2 seconds without triggering. The resistance of the stator coils should be 73 ohms each and the
magnetic rotor should have south poles facing outwards.
This unit can be adapted for use on engines firing at 180 degrees camshaft or 360 crankshaft
degrees. This unit will operate two coils to 10,000 sparks per minute. The typical working
advance is 10 degrees at 2500 RPM. This unit must be operated with the frame chassis acting
as an electrical return, whether positive or negative polarity. If the engine is rubber mounted a
good engine earth strap must be fitted. This unit will operate from an alternator, rectifier, zener
diode and capacitor battery-less system but starting may be more difficult. If the zener diode
disconnects when the engine is running the unit may be damaged. Both spark plugs are fired
at the same time thus, if the engine only runs on one cylinder, the fault can be traced to a
mechanical/spark plug/ignition coil/ht lead and not the transistor pack or stator plate.
IGNITION TIMING FOR BRITISH TWINS
TRIUMPH TWIN CLOCKWISE 38 degrees fully advanced
BSA TWIN ANTI CLOCKWISE 34 degrees fully advanced
NORTON COMMANDO ANTI CLOCKWISE 28/31 degrees fully advanced
NORTON ATLAS CLOCKWISE 28/31 degrees fully advanced
RECOMMENDED IGNITION COILS
6 VOLT SINGLE OUTPUT COIL
12 VOLT DUAL OUTPUT COIL
HT LEADS & SPARK PLUG CAPS
We recommend fitting a good quality 5k resistor type plug cap
Non-resistor caps can also be fitted
INSTALLATION INSTRUCTIONS – TWIN CYLINDER
Warning: This unit can produce high voltages.
Always disconnect the battery before working on the system!
1 Disconnect the battery
2 Remove the petrol tank and/or seat for access to the ignition coils & condensers
3 Remove the contact breaker plate and automatic advance unit
4 Trace the two contact breaker wires (normally black, white/black or yellow) up to the
condenser pack/ignition coils and disconnect. These are no longer required
5 Remove the other wires from the ignition coil terminal`s. These will be negative feed wires
from the ignition switch
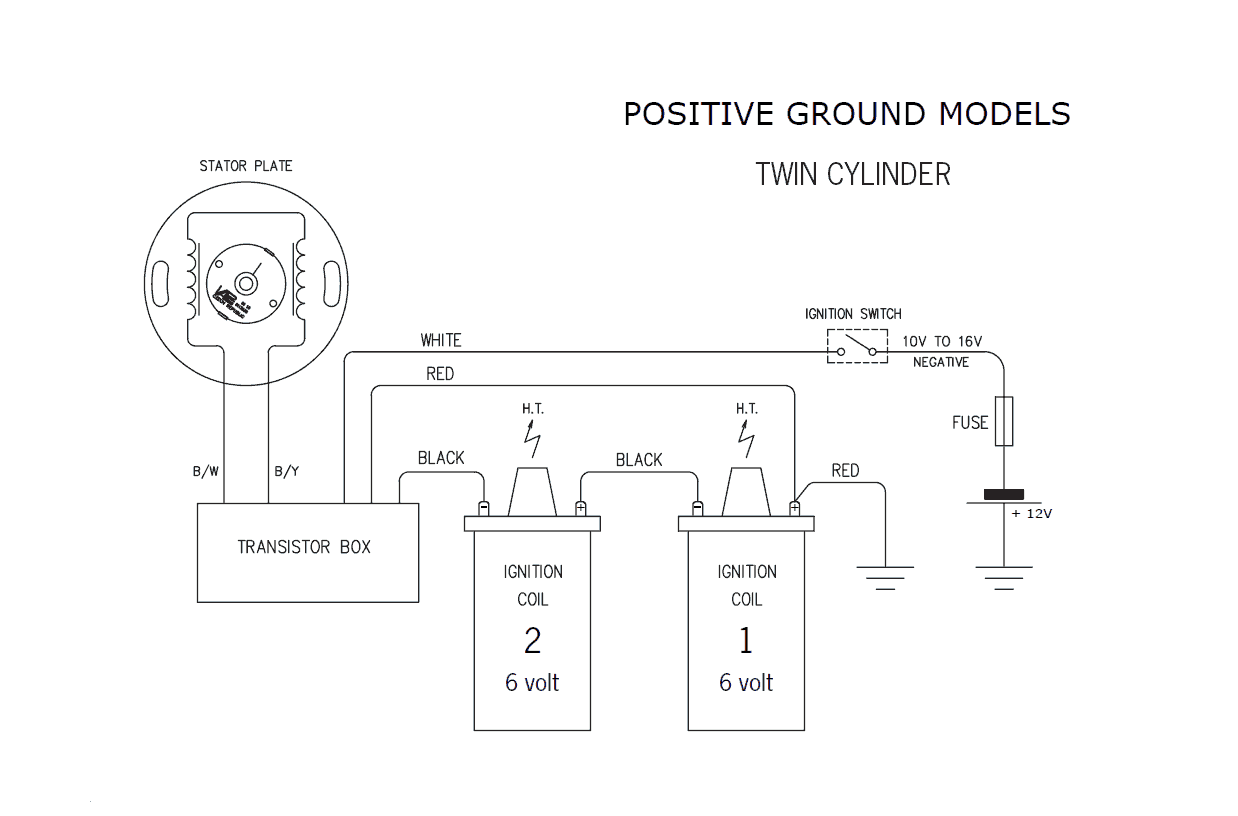
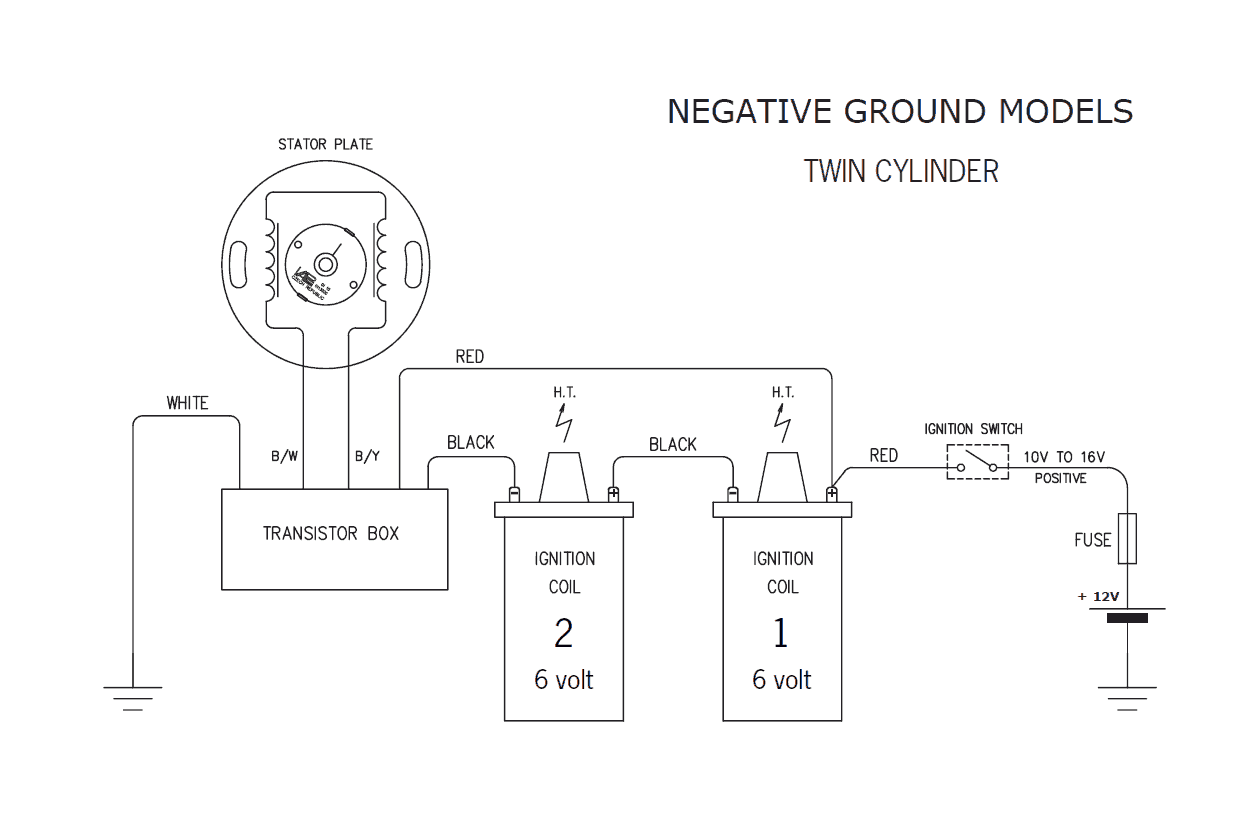
6 Link the coils using the black link wire. The negative of one coil to the positive of the other. Cut
the link wire to the correct length and ensure female lucar connectors are crimped/soldered
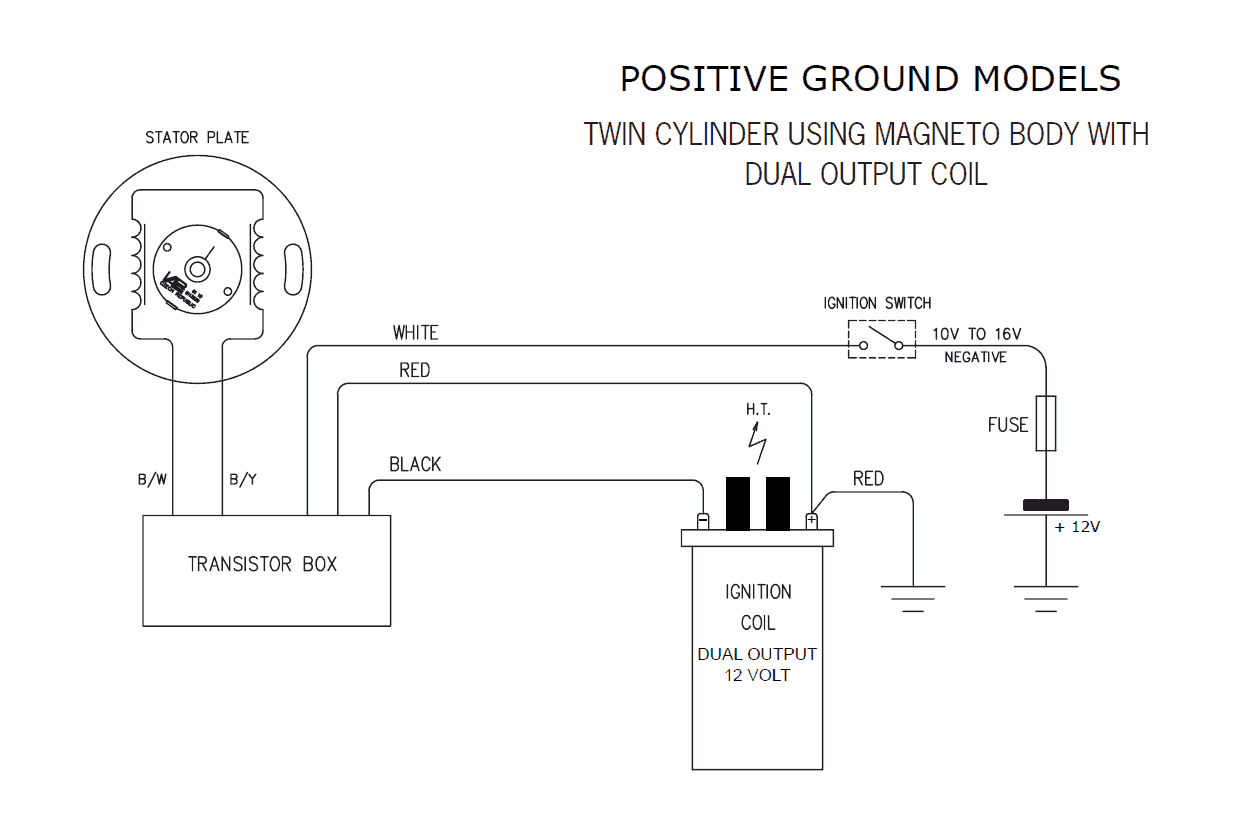
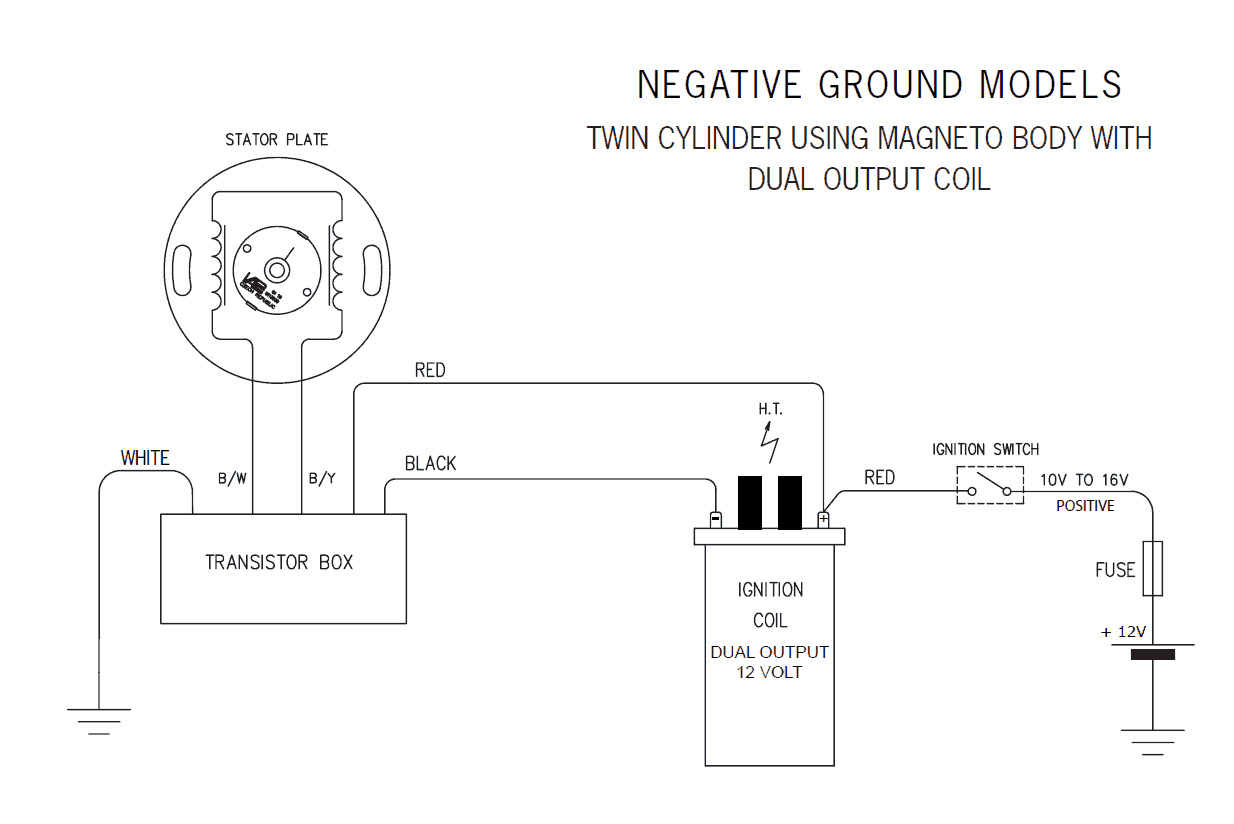
7 Using the red positive earth wire, connect the positive of the first coil to a good frame earth
or positive battery terminal on positive earth models (via the ignition switch feed on negative
earth models). See the appropriate wiring diagram for your model
8 Find a position for the transistor box near the ignition coils and mount using cable ties.
Ensure both wiring block connectors can be accessed to attach the wiring
9 Connect the black wire from the transistor box to the negative on the second coil (see wiring
diagram).Remove the outer protective sleeve and cut the wire to required length.
Re-fit sleeve as required
10 Connect the red wire from the transistor box to the positive terminal of the first coil (same
point as the earth wire. See wiring diagram)
11 Connect the white wire from the transistor box to the ignition switch feed on POSITIVE
ground models and to a suitable earth on NEGATIVE ground models (see wiring diagrams).
Remove outer protective sleeve and cut wire to the required length. Re-fit sleeve as required
12 Connect the black/yellow from the transistor box to the black/yellow from the stator plate.
Both black/yellow and black/white share a common sleeve. Cut the sleeve to desired length
13 Connect the black/white from the transistor box to the black/white from the stator plate
14 Insulate the ends of any unused wires and check all connections are good and tight fitting
15 Remove the timing inspection cover from the alternator side of the engine
16 Set the engine at the fully advanced timing mark on the compression stroke
17 Fit the magnetic rotor in to the end of the camshaft in the contact housing using one of the
bolts supplied (either BSF or UNF depending on model). Check that the bolt does not bottom
on the thread. If it is too long, cut off a small amount of the thread
18 Hold the stator plate in the contact breaker housing. Centralise the adjustment slots and turn
the magnetic rotor on its taper until the timing mark lines up with the appropriate timing mark.
Anti-clock A or clock C, depending on model. This must be done without moving the engine
setting.A rotor spanner is provided to move the rotor (good tip: mark the stator timing position
on to the engine case with a marker pen and align the rotor timing mark to it).
The stator plate should be central on the adjustment slots, with the rotor timing mark central
in the timing position hole
19 Tighten the rotor locating bolt and check the engine position has not moved
20 Fit the stator plate with pillar bolts and connect the black/white & black/yellow wires to the
stator plate using male bullet connectors
WIRING: All connections must be of the highest quality crimped and/or soldered. Twisted
wires will not give satisfactory operation. Also, avoid coiling up any surplus wiring. Cut
to length and make new connections where required
21 Refit the tank seat and re-connect the battery
22 Start the engine and warm it up to normal working temperature for 4-5 minutes. Connect a
strobe lamp and time with the engine running at 4000-5000 RPM. This is adjusted by sliding
the stator plate on its slotted holes. If timing marks cannot be aligned before the end of the
adjustment slots then the magnetic rotor must be re-positioned
23 Refit the contact breaker cover and alternator timing cover. The timing is now set and should
require no further adjustment
CLICK PICTURE TO ENLARGE
12 VOLT IGNITION – SINGLE CYLINDER MODELS
POSITIVE OR NEGATIVE GROUND WITH POINTS IN THE SIDE CASING
GENERAL DATA
This unit can work with positive or negative earth as long as the coil is fed from a positive
supply. The working voltage is 10-16 volts. The maximum current through the unit must not
exceed 5 amps. For road application a 12 volt coil is recommended. Any short circuit
on the ignition coil will damage the unit. The coil current should drop to zero after 2 seconds
without triggering. The resistance of the stator coils should be 73 ohms each and the magnetic
rotor should have south poles facing outwards.
This unit can be adapted for use on engines firing at 180 degrees camshaft or 360 crankshaft
degrees. This unit will operate two coils to 10,000 sparks per minute. Typical working advance
is 10 degrees at 2500 RPM. This unit must be operated with the frame chassis acting as an
electrical return, whether positive or negative polarity. If the engine is rubber mounted a good
engine earth strap must be fitted. This unit will operate from an alternator, rectifier, zener
diode and capacitor battery-less system but starting may be more difficult. If the zener diode
disconnects when the engine is running the unit may be damaged. Both spark plugs are fired
at the same time thus, if the engine only runs on one cylinder, the fault can be traced to a
mechanical/ spark plug/ignition coil/ht lead and not the transistor pack or stator plate
IGNITION TIMING FOR BRITISH SINGLES
BSA C15/B40 ANTI CLOCKWISE 33.5 BTDC full advance
BSA B25 ANTI CLOCKWISE 37 BTDC full advance
BSA B44 ANTI CLOCKWISE 28 BTDC full advance
BSA B50 ANTI CLOCKWISE 34 BTDC full advance
T20 CUB -67 ANTI CLOCKWISE 36 BTDC full advance
T20 CUB 67- ANTI CLOCKWISE 32 BTDC full advance
RECOMMENDED IGNITION COILS
12 VOLT SINGLE OUTPUT COIL
INSTALLATION INSTRUCTIONS – SINGLE CYLINDER
Warning: This unit can produce high voltages.
Always disconnect the battery before working on the system!
1 Disconnect the battery
2 Remove the petrol tank and/or seat for access to the ignition coils & condensers
3 Remove the alternator rotor cover if fitted
4 Loosen the automatic advance unit centre bolt
5 Rotate the engine to the correct full advance timing position (see additional timing
information).These rotor marks should be checked for correct alignment and should line up
with the engine set in the full advance position. If in doubt, check with a timing disc and dial
gauge in the spark plug hole, then re-mark the rotor as required. Models produced after 1969
have a timing plug on the left hand crankcase
6 Remove the kick start and gear lever and remove the outer timing cover
7 Remove the contact breaker plate and lead
8 Remove the automatic unit centre bolt and remove the auto advance unit. This can be done
by using the extractor bolt supplied, or a light tap sideways will remove it from the taper
9 Fit the magnetic rotor in place of the automatic unit using one of the bolts supplied, either BSF
on pre 1968 engines or UNF on later models. Check the bolt does not bottom on the thread.
Shorten the bolt if required. Do not tighten the bolt as adjustment will be required
10 Hold the stator plate in the contact breaker housing. Centralise the adjustment slots and turn
the magnetic rotor on its taper to align it with the appropriate timing mark (anti-clock A clock
C depending on model). This must be done without moving the engine static setting (mark
the stator timing mark position on to the engine case with a marker pen and align the rotor to
it). The stator plate should be central on the adjuster slots with the rotor timing mark central
in the timing position hole
11 Check the engine has not moved and tighten the rotor fixing bolt
12 Fit the stator plate with pillar bolts and connect the black/yellow & black/white wires to the
stator plate. Bullet connection ensure wires are connected the right way round as this will
affect ignition timing. Route the wires through the appropriate grommet clips on the inner
timing cover and secure them to the front frame tube with cable ties
13 Refit the outer timing cover and kick start/gear levers
14 Remove all wires from the ignition coil terminals. These will be the original CB lead and feed
from the ignition switch and the external condenser if fitted
15 Find a position for the transistor box near the ignition coil and mount using cable ties. Ensure
both wiring block connectors can be accessed to attach the wiring
INSTALLATION INSTRUCTIONS (cont)
NEGATIVE GROUND ELECTRICS
16 For NEGATIVE ground electrics take the black lead from the transistor box. Cut to length
and connect to the negative coil terminal using an insulated spade terminal
17 Take the red wire from the transistor box, cut to length and connect to the positive ignition
coil terminal with an insulated spade terminal
18 Connect the ignition switch feed wire to the positive terminal of the ignition coil
19 Take the white wire from the transistor box, cut to length and connect to a good grounding
point (negative [-] battery terminal recommended)
POSITIVE GROUND ELECTRICS
20 For POSITIVE ground electrics take the white wire from the transistor box, cut to length and
connect to the ignition switch feed wire previously connected to the ignition coil
21 Take the red wire from the transistor box and connect to the ignition coil positive terminal
22 Take a separate ground wire from the positive coil terminal to a good grounding point
(positive [+] battery terminal recommended)
23 Take the black wire from the transistor box, cut to length and connect to the negative ignition
coil terminal
WIRING: All connections must be of the highest quality crimped and/or soldered. Twisted
wires will not give satisfactory operation. Also, avoid coiling up any surplus wiring. Cut
to length and make new connections where required
24 Refit the tank seat and re-connect battery
25 Start the engine and warm it up to normal working temperature for 4-5 minutes. Connect a
strobe lamp and time with the engine running at 4000-5000 RPM. This is adjusted by sliding
the stator plate on its slotted holes. If the timing marks cannot be aligned before the end of
the adjustment slots, then the magnetic rotor must be re-positioned
26 Re-fi t the contact breaker cover and alternator timing cover. The timing is now set and should
require no further adjustment
27 EARLY C15 / B40 / T20 MODELS DO NOT HAVE PROVISION FOR STROBE TIMING
so road testing will be required for optimum performance. Adjust the stator plate as later
models. NOTE: As the camshaft rotates at half the engine speed, 20 degrees crank
movement is equal to 10 degree camshaft movement
TROUBLESHOOTING
NO SPARK
1 Check the battery has power
2 Using a test bulb or voltmeter/multimeter check for a power feed to the ignition module from
the ignition switch. Measure between the ignition feed wire and ground with ignition switch on
3 The voltage reading here should be the same as the voltage on the motorcycle battery
(12volts). If a significantly lower voltage is detected then this can indicate a faulty ignition
switch or a bad connection in the ignition circuit/wiring loom. A simple test is to take a direct
feed from the battery to the ignition pack, bypassing the normal feed from the ignition switch
STATOR PLATE
1 Check wiring connections on black/white / black /yellow wires. Check for any visible signs of
damage on the stator plate and ensure the rotor is correctly located in taper seating
2 Using a multi meter check continuity through the stator plate. Set the meter to ohms. The
resistance reading for each coil should be 73 ohms. Connect the meter to the black/white &
black/yellow leads and the combined resistance should be 146 ohms
SPARKS ON CRANKING BUT ENGINE WILL NOT RUN
1 Check polarity of wires from the ignition module to stator (y/b to y/b & w/b to w/b). If these
wires are connected incorrectly ignition will produce a spark but the timing will be retarded
CONTINUOUS SPARKING WITHOUT CRANKING ENGINE
1 This indicates a poor supply to the ignition. Check battery for a bad cell. A bad battery with
charger connected can cause this problem
2 Check for good engine earth connection and battery earth point
3 Wrong type of ignition coil fitted with low primary resistance

2 thoughts on “Vape Ignition Installation and Troubleshooting”
jose garcia
October 13, 2020 at 2:32 pm
have installed a wassel electronic ignition and it fails at high rpm … what can it be?
the ignition time is correct, it starts well. Wires well connected, coil with correct resistance Spark plug pipe with 5k resistance
Nick Willcutt
October 14, 2020 at 9:47 am
Hello Jose,
The Vape ignition, like the others we stock, have a built in rev limiter. The sparks will stop at about 9500 rpm. If the loss of spark is occuring below this you might want to send it to us for testing.
Regards,
Nick
JRC
Comments are closed.